
Connecting a 3rd generation Nest Learning Thermostat is pretty simple if you know where to connect the wires. In this blog I have some instructions to connect to the Bosch 26 HRC furnace. The first part is about the old connection and the second part is about connecting the Nest.
First I didn’t get it to work, this was because the OpenTherm module was disconnect for the previous installation. The red circle shows the disconnected plug.
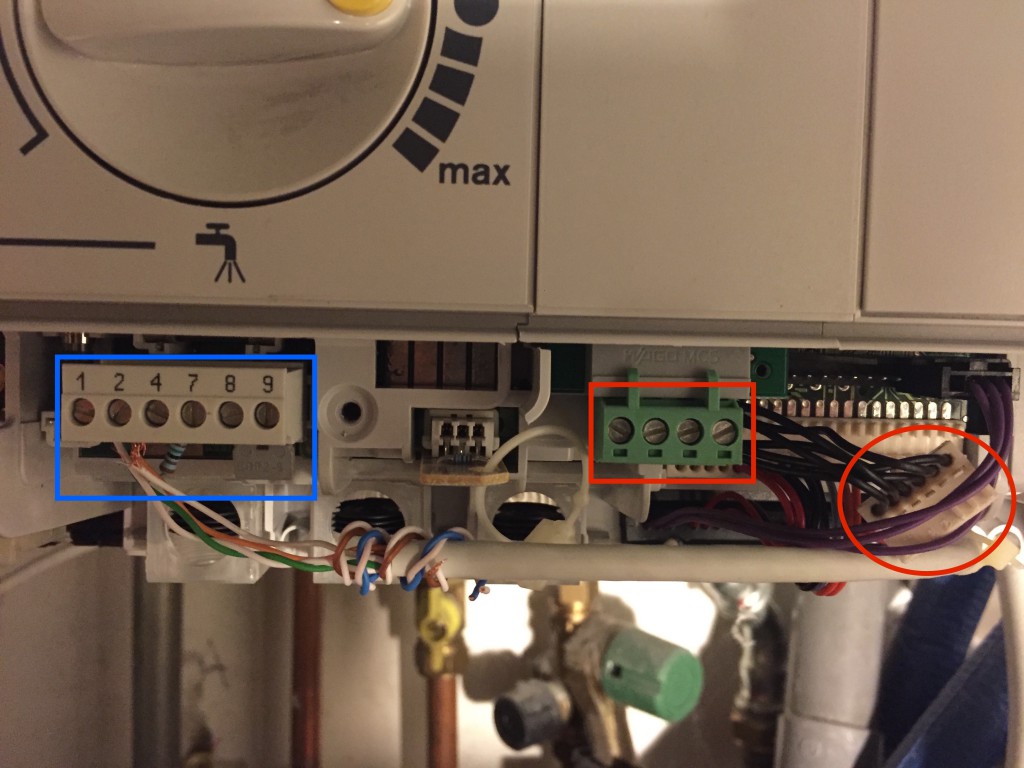
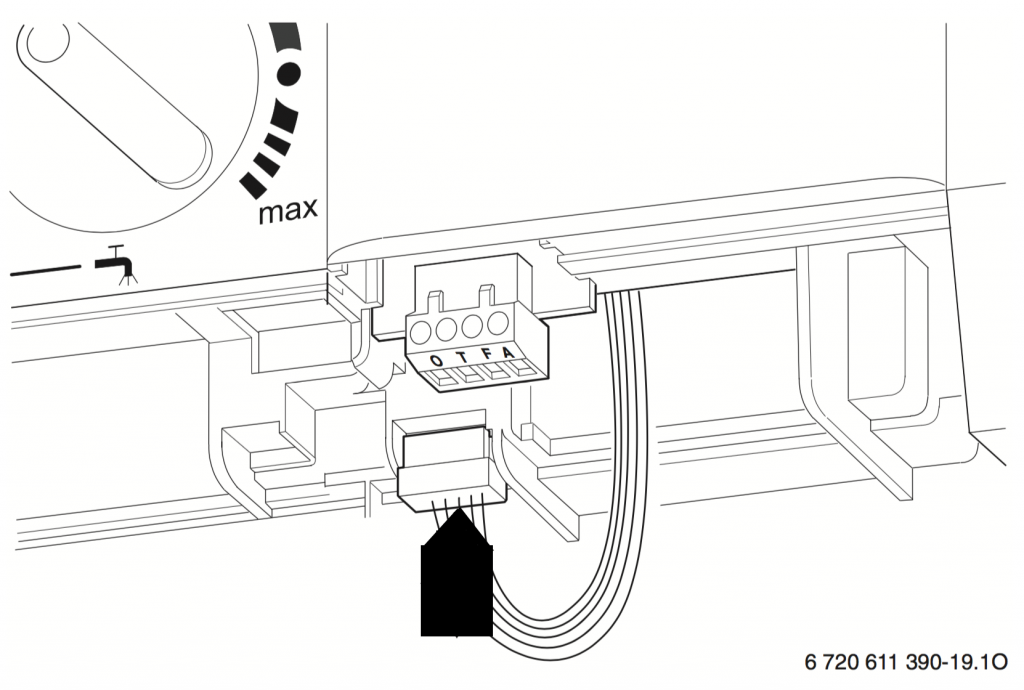
Blue square = Bosch connection, red square = OpenTherm module connections, red circle = Opentherm connector.
This OpenTherm connector was unplugged/disconnected because the previous thermostat was a simple on/off (non-modulating) thermostat which was connected like this schema on the Bosch furnace:
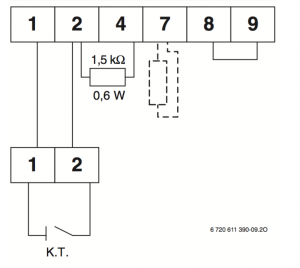
Connect a non modulating thermostat to Bosch 26 HRC (image source: Bosch 26 HRC manual)
So the very sloppy wires in the blue square pins 1 and 2 are connected to the old thermostat in the living room. The resistor is connected between 2 and 4 and there is a bridge between 8 and 9.
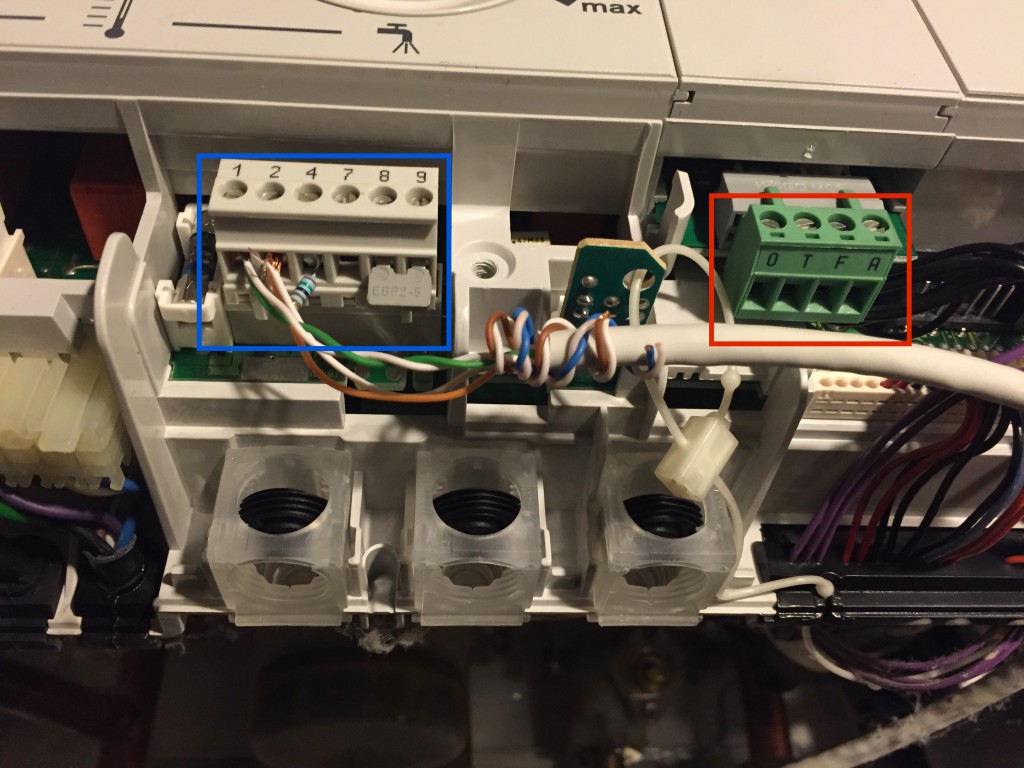
Blue square = Bosch connection, red square = OpenTherm module connections
So this was the old working connection with an old non modulating thermostat. The Red square in the picture above shows the pins connected to the OpenTherm module. Bosch calls this the OTM1 in their manual. 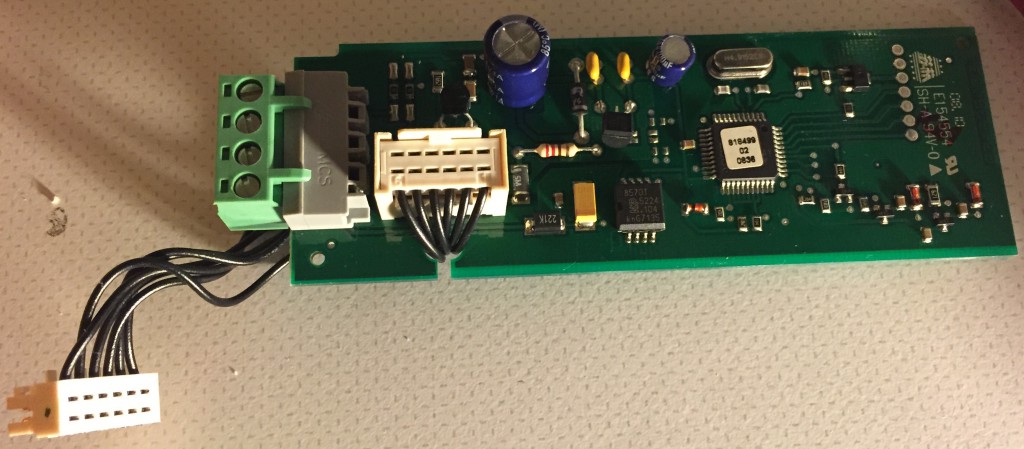
OpenTherm Module (OTM1)
I removed to old wires (in the blue square) and placed the resistor as a loop on pin 7 (as the original state) and then plugged in the OpenTherm plug onto the board just as the picture below:
Connect the OpenTherm Module (OTM1) to the furnace (image source: Bosch 26 HRC maunal)
Now connecting the Nest is simple. Nest comes with a Heat Link unit which you have to connect to the furnace and a thermostat which you probably place in your living room.
The 3rd generation Heat link looks like this:
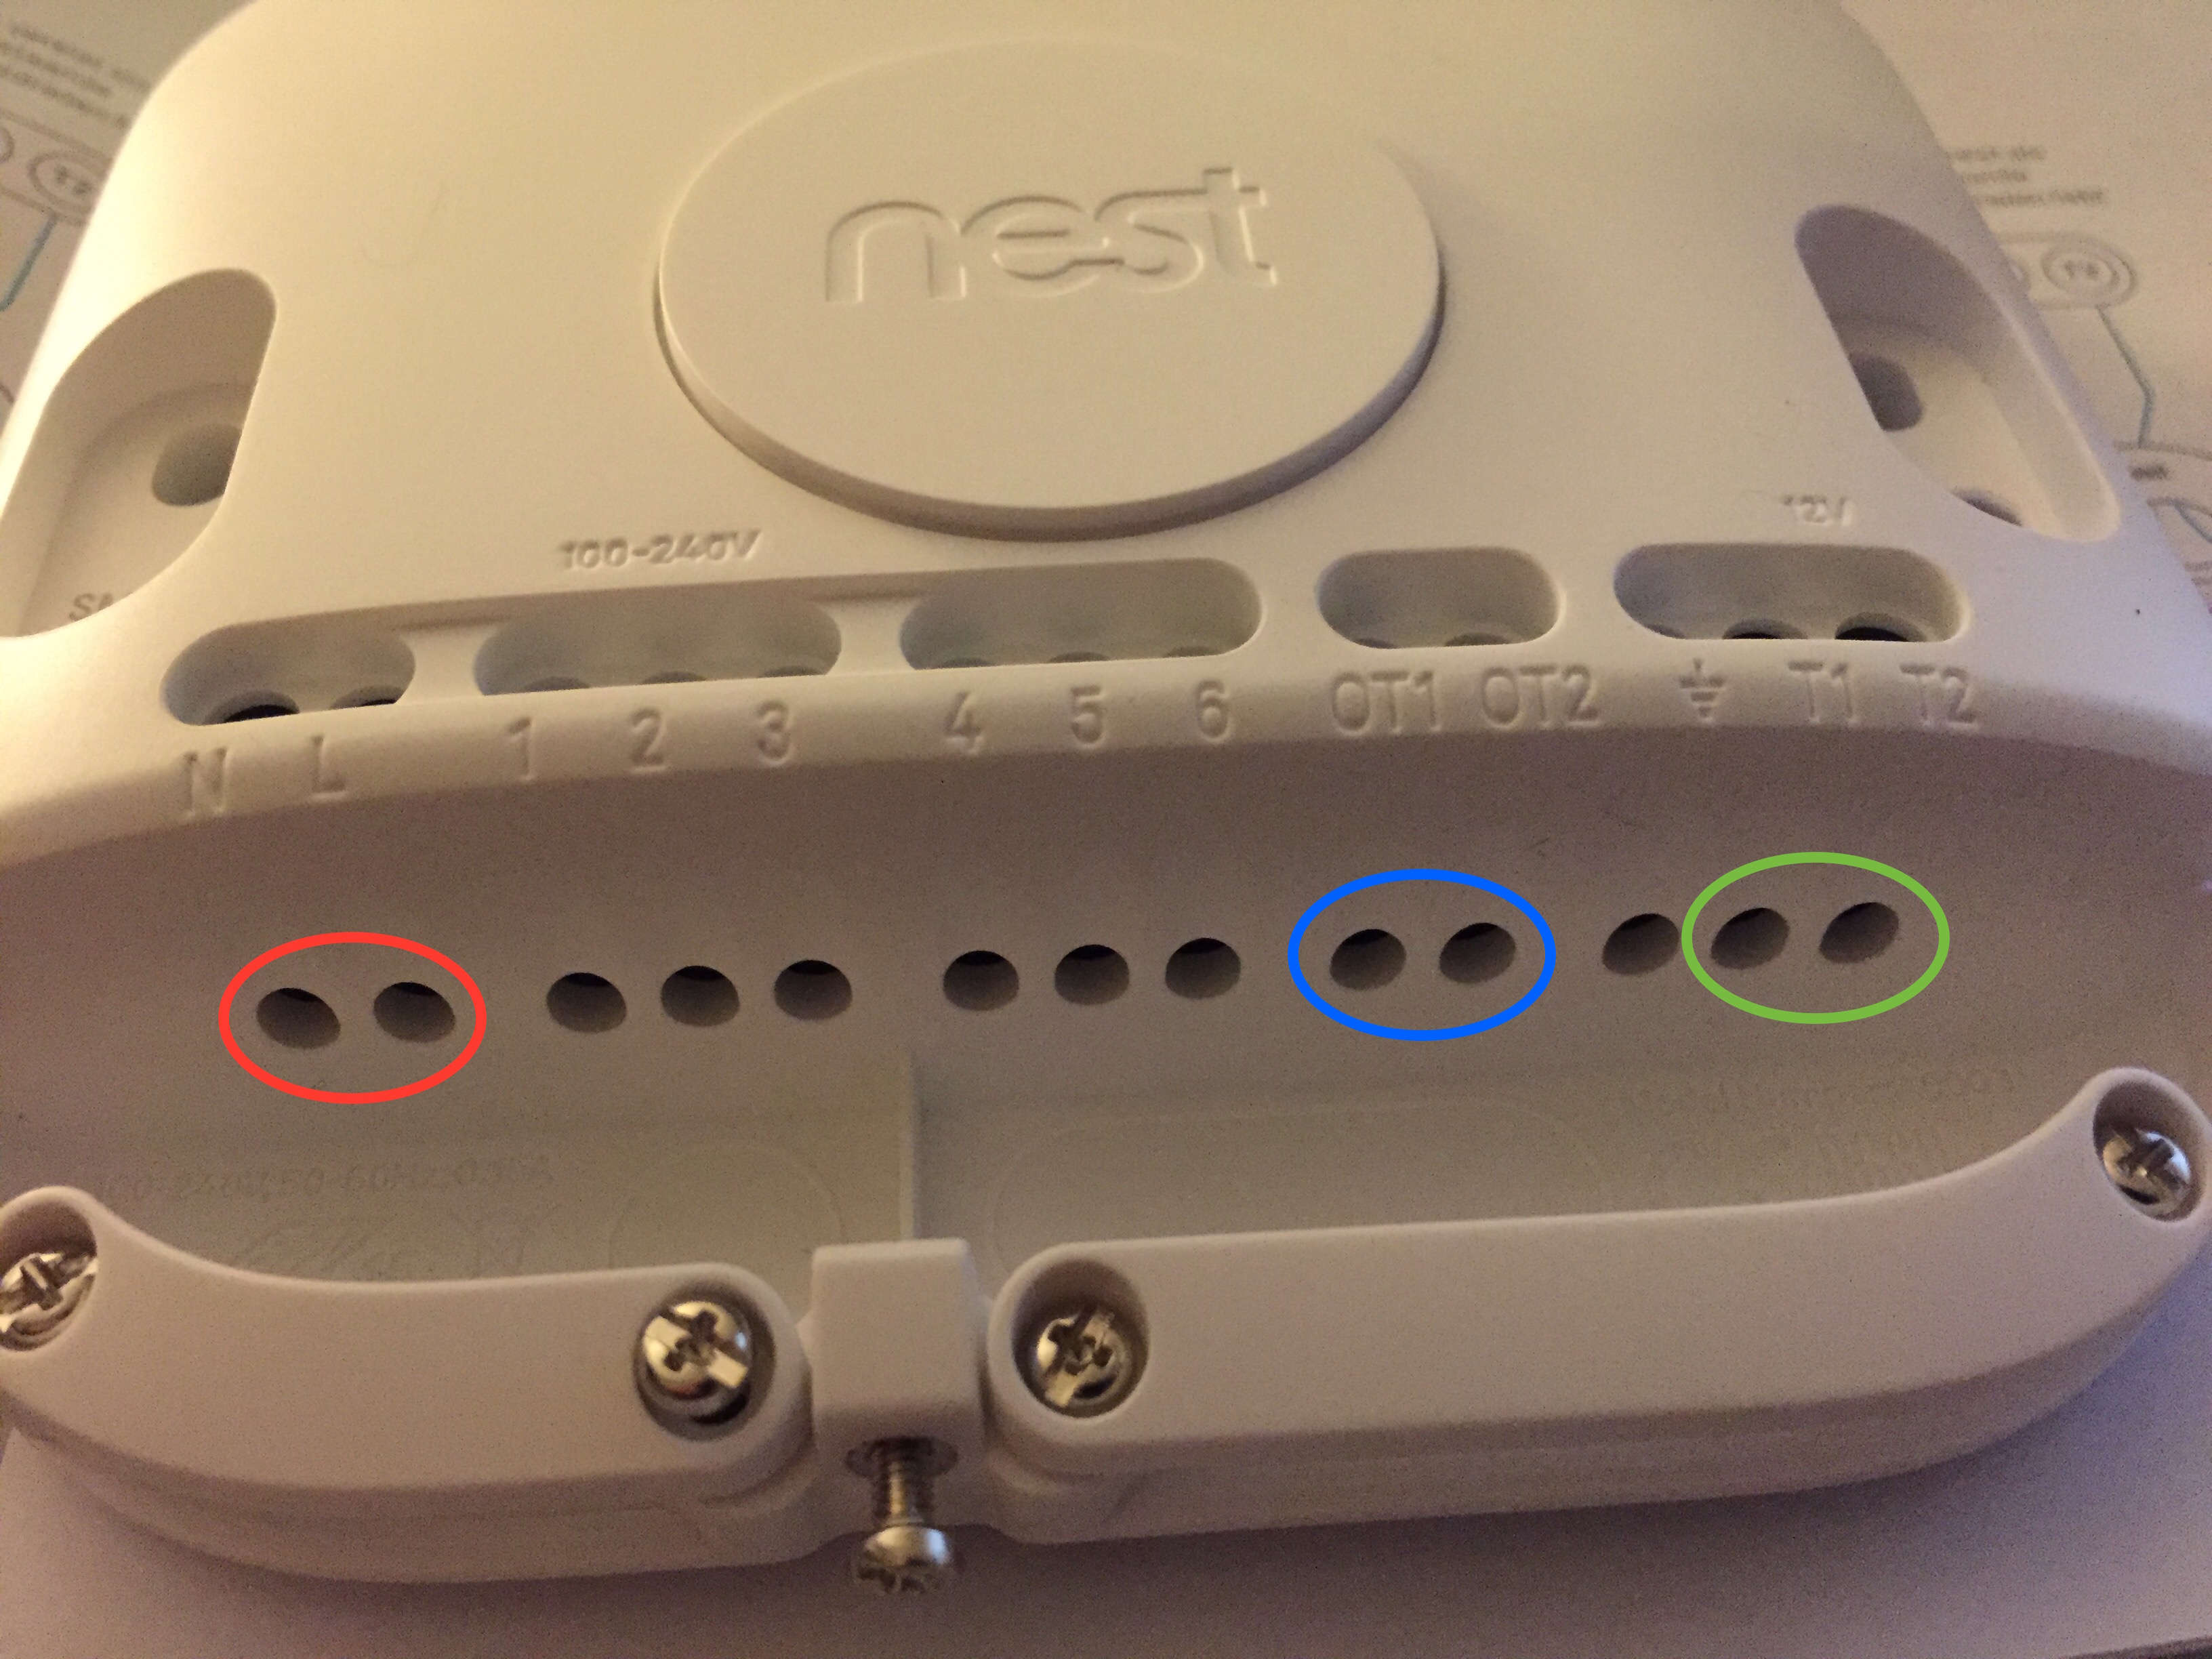
Nest Heat Link
The three circles mean;
- Red; 230V to power the Heat Link unit
- Blue; connections to furnace OpenTherm adapter pins O and T
- Green; connection to the Nest Thermostat
In the Installation Guide you can find this image for this 3 connection pairs.
 Nest OpenTherm connection schema (
image source (PDF))
That’s all. the most time I spend figuring out how to the connect the Bosch OTM1 module to the furnace and remove the old wires. good luck!
Hi Peter, thanks so much for the clear instructions. My time-consumer was finding the place where i should put the OTM1 connector :)
I disconnected all the old on/off connections and connected the OT1 and OT2
Can you please tell me why i should reconnect the resistor as a loop on pin 7?
It this moment there is no wires and resistor in the blue-square part, all seems to work.
Thanks for your reply
Hi Yke,
The loop on pin 7 is not needed. Just a place to store you resistor.
Ha Peter,
Thanks to you I’ve got it all working. A Nest 3rd gen and a Bosch 35 HRC. With the loop on nr 7….
Many thanks,
Wout Donker
The Netherlands
Hoe bedoel je dat met lus op nr7, hij werkt iedergeval nog niet bij mij met de bovenstaande instructies heb ook de 35 HRC. Bedoel je gewoon lus met draden of de oude situatie met een weerstand?
hartelijke dank,
V
Hi,
Is it important how to connect OT1 and OT2 on Bosch O and T?
How to check that my bosch is modulating?
What are the yours pro-settings on the nest thermostat for bosch?
Awesome write up Peter.
Is the OT1 and OT2 sending high voltage out our is it similar low 12v like that of the T1 and T2? I’m trying to connect my Calenta Remeha multi boiler.. And have no voltage meter on me to test this output.
Dankjewel Peter,
Ik heb een Nest thermostaat al een jaar of 4 geleden laten monteren, maar kom er nu achter dat hij op aan/uit is aangesloten en dat OT module helemaal niet aangesloten is geweest.
Dankzij jou duidelijke uitleg denk ik dat het nu goed moet zijn.
Kan dit ook helpen om de temperatuur gelijkmatiger te krijgen?
Het schiet hier steeds door van erg warm naar te koud, er zit veel teveel verschil tussen aan en uit.
Thanks alot for the instructions! Could you by any chance post a picture showing where you plugged the omt1 into the board? I cant find it.
Ik wil advies krijgen over 26 module hr
Hello
I live in Tbilisi, Georgia. I have Bosch 30 hrc and it’s showing “A8”. Please someone teach me how can I solve this problem