IPv6 tunnel on Time Capsule

Most Internet Service Providers (ISP) don’t have the ability yet to get native IPv6 on your home router/modem. Most modems the ISP provides don’t have the ability to router IPv6 packets, but only IPv4. If you ask you ISP to configure their provided modem in a bridged mode, you then can connect you own device to it and that device will provide your router function in your home network.

If you use a Time Capsule as your home router you can fairly easy set up a IPv6 tunnel if your provider does not support a native IPv6 connection. This tunnel allows you to connect to the IPv6 Internet. Your connection with your ISP will still be only using IPv4. If you connect to a website which is only available via IPv4 nothing will change. If you connect to a website which is available on IPv6. Your home router will encapsulate the IPv6 packet into an IPv4 packet and send it to the other end of the tunnel. The packet which normally only has a IPv6 header, now has a IPv4 header in front of it. Therefore your ISP will handle this traffic exactly the same as the other IPv4 packets.
So how does your router know to where it must send the encapsulated IPv6 packet? You tell the router by configuring the tunnel parameters manually. For such a configuration you need a so called Tunnel Broker. This Tunnel Broker is the other end of the Tunnel where the IPv4 header is removed again and only the IPv6 packet will be left and routed to the final destination.
So before you can start your manual IPv6 tunnel configuration, the only thing you need is so called Tunnel Broker. I use the Hurricane Electric Free IPv6 Tunnel Broker.

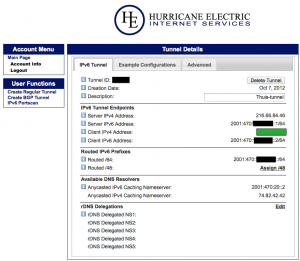
On the website you must provide the Tunnel Broker with your IPv4 address. If you don’t know your IPv4 address, you can check this on www.whatismyip.com. Your details will look like:
tunnelbroker.net-tunnel-details
Tunnelbroker.net Tunnel details

The black blocks are specific for your connection, and at the green block you have to fill your home IPv4 address.

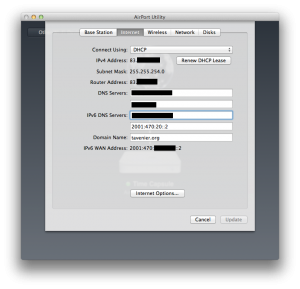
Go to the settings of your TC with the Airport Utility and select the tab Internet:
Airport Utility - Internet tab
Airport Utility – Internet tab

on the field IPv6 DNS Servers fill in the Anycasted IPv6 Caching Nameserver address.
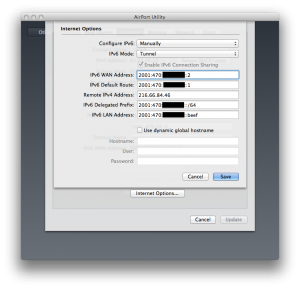
Form there go to to button Internet Options… which is located at the bottom. Now you can start configuring your IPv6 tunnel.
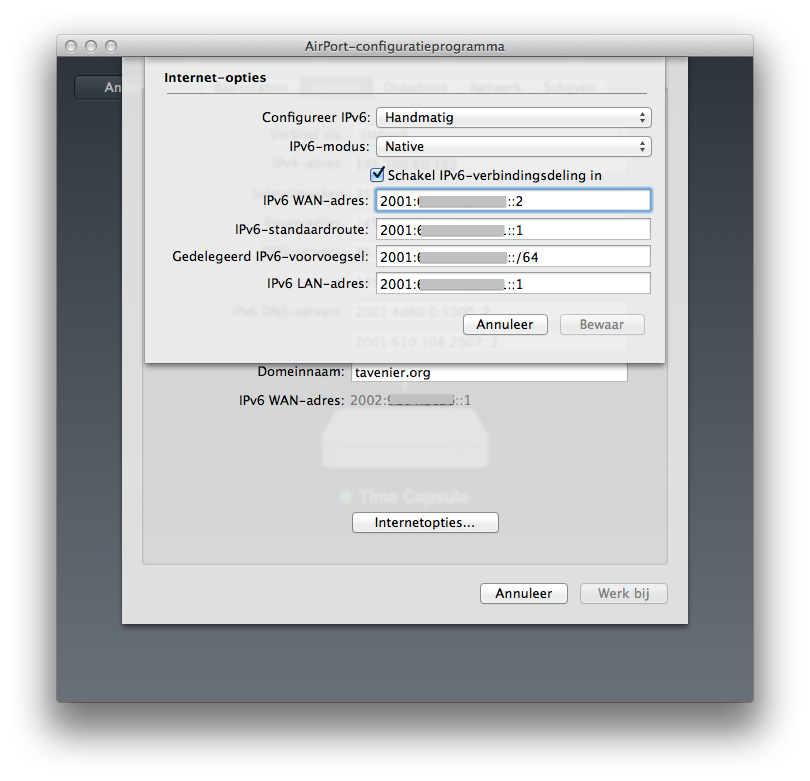
Airport Utility - Internet options
Airport Utility – Internet options

From the drop down menu’s select Manually for Configure IPv6 and choose Tunnel for IPv6 mode.
Now you only need to fill in some addresses which are on the tunnelbroker.net webpage. The fields you need for you Time Capsule configuration are:

  • IPv6 WAN Address: Client IPv6 Address
  • IPv6 Default Route: Server IPv6 Address
  • Remote IPv4 Address: Server IPv4 Address
  • IPv6 Delegate Prefix: Routed /64
  • IPV6 LAN Address: choose a address form the Routed /64 you filled in the line above. e.g. the prefix ending with ::1

Now your tunnel is set up correctly. Go to test-ipv6.com to test your IPv6.
Time Capsule update 7.6.3 breaks IPv6

The latest version for the Time Capsule is at the moment is 7.6.3.
I installed this update and after the installation I experienced issues with my IPv6 connectivity. I googled around and found many discussions and blogs where people are explaining they have issues with IPv6 tunnels (6in4) after the update.

When I started my AirPort Utility I noticed that my native IPv6 configuration options are still the same. But the weird thing is that Apple somehow changed the IPv6 WAN address to address from the 6to4 prefix (described in RFC 3056). This prefix starts with 2002: then followed by the IP Address converted to hexadecimal numbers, which together makes the /48 6to4 prefix.

So if my IPv4 address was 123.234.123.234 my 6to4 address would be: 2002:7BEA:7BEA::/48. You need to do the calculation from decimal to hexadecimal (123 = 0x7B and 234 = 0xEA).

The weird thing is that in the configuration you can see my address was still manually configured to a IPv6 unicast prefix, but somehow Apple changed the active IPv6 on the WAN interface to the 6to4 prefix. You can see this in the picture below:
IPv6  configuration Time Capsule

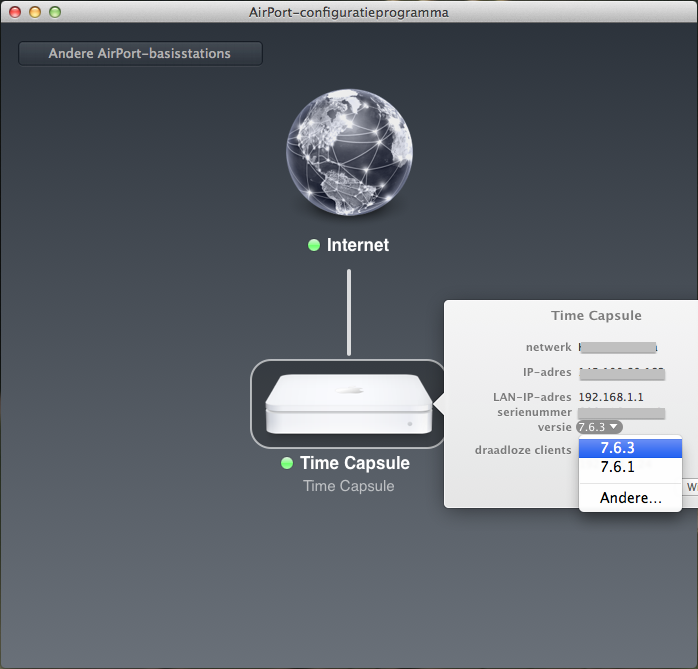
The only solution to get IPv6 to work again is to downgrade the Time Capsule. You need to click on your Time Capsule. When you hover over you version number and use the ‘option’ button when you click you get the option to select your previous version number. See the screenshot below:
Downgrade Time Capsule

After the downgrade to 7.6.1 I see that the configured IPv6 WAN address is the same as the active IPv6 address. A visit to test-ipv6.com shows that IPv6 is working again :).

Links
RIPE IPv6 reference card (very useful as a quick reference for the different IPv6 prefixes)

27″ iMac Intel processors

I was looking for the type of Intel processors Apple is using for the new 27″ iMac. There is no list from Apple where a exact types are mentioned. When I started to search on the Intel website which CPU’s exactly match the descriptions Apple give on their website.

There are three types of processors, according Apple’s descriptions:

  • 2.9GHz quad-core Intel Core i5 processor (Turbo Boost up to 3.6GHz) with 6MB L3 cache
  • 3.2GHz quad-core Intel Core i5 processor (Turbo Boost up to 3.6GHz) with 6MB L3 cache
  • 3.4GHz quad-core Intel Core i7 processor (Turbo Boost up to 3.9GHz)

A quick search on the Intel website brings me to the following Intel processors:

The only difference between the two 2.9GHz i5 processors the Graphics Models; the i5-3470S uses an Intel® HD Graphics 2500 and the i5-3475S a Intel® HD Graphics 4000. I’m not sure which model Apple puts in there new iMac’s.

The difference biggest between the i5-3470 and i7-3770, next to the difference in clock speeds, is that the i7 supports Intel® Hyper-Threading Technology. which allows the i7 up to 8 simultaneous threads (2 on each core) and therefor use the processor more efficiently.

See the details and comparison on the Intel website.